bullseye tie dye method
Lay the shirt flat on a table. Prewash fabric to remove sizing.

17 Tie Dye Patterns And Folding Techniques Sarah Maker
Step three Once each nub has been dyed lay the item out flat and carefully apply dye to the remaining surface area.

. Place your shirt on a flat surface. Place rubber band about 1 from the top continue banding every. Crumple Tie Dye Technique.
The first place that you gather and tie down fabric will be the center of your bullseye. You can make so many different looks from this one technique. Rinse fabric until water runs clear.
To create your own unique pattern you will want to use rubber bands or twine to scrunch fold or twist the hoodie. Youll definitely want to try this tie dye tutorial out. This technique is a tried-and-true tie dye method that yields beautiful results.
Center your design like we did for a fun look or even place it off center for an even more one of a kind finished product. Refer back to them for standard steps. Cover work surface with a.
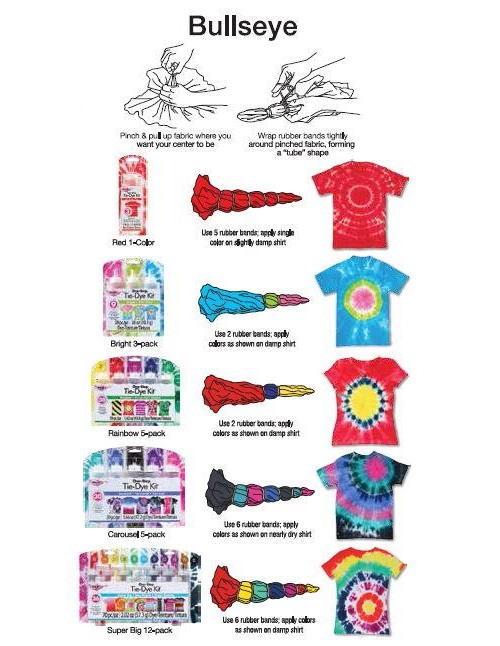
Probably the most recognized tie-dye technique and the easiest. Add the dye to each section both front and back. Bullseye The bullseye method is in the center in the picture below.
Bind with rubber bands. The bullseye tie dye technique is such a versatile tie dyeing pattern. Youll fall in love with simple yet spunky tie dye pattern that will wow everyone who sees it.
Bullseye tie dye pattern. Each nub can be one color or as many colors as there are sections. Tie Dye Tutorials to Try Bullseye Tie Dye Technique.
Dye each section a different color in rainbow order. Not just for Valentines Day heart tie dye designs look great in a variety of applications. Hen apply your dyes and let the cloth rest in a plastic bag for a while.
Dye each bullseye nub before dying the rest of the item. Wash and dry fabric as usual you may also set design with a warm iron if preferred. One of the easiest binding methods is literally scrunching the fabric into a ball then tying the ball into segments with a few elastic bands criss-crossing at the centre.
Bullseye Tie Dye Technique Bullseye Tie Dye Technique Infographic. Place the dyed shirt in the container that comes in the kit or simply plastic wrap and seal the edges. Allow the dye to set for a minimum of 6-8 hours.
You can also scrunch the t-shirt into a long thin shape and tie the bands along the length to create a crumpled stripe effect. The bullseye is like the poster child of the tie dye world. If you want the bullseye to be off-center choose a small section off-center Pull the pinched fabric up to a point and smooth the rest of the shirt down to create a skinny cone shape.
Place the wrapped fabric on a paper towel in the microwave and heat for 1 to 2 minutes. Tie Dye Design Tutorial Video For A Bullseye Tie Dye Shirt Youtube How To Tie Dye Bullseye Pattern Tulip Tie Dye Store Learn Tie Dye From The Pros Shop Vibrant Fabric Dye Colors Bullseye Tie Dye Technique Tie Dye Bullseye How To Make The Classic Tie Dye Pattern Chaotically. Bullseye tie dye method Louis Spears.
Tuesday 1 March 2022. Be sure to squeeze the colors at the rubber bands to help them blend. I used red yellow then blue.
Do not use fabric softener or dryer sheets. Corner Bullseye Tie Dye Pattern. Place the shirt into a gallon bag and zip it shut.
Then tie it with rubber bands spacing them evenly. Squeeze different color dye on each section or alternate the colors. Decide where you want the bullseye to appear.
Rainbow Bullseye Tie Dye Pattern Pinch the middle of the shirt and lift up gathering the rest of the shirt. Take each nub one at a time hold it away from the rest of the fabric and carefully apply dye. This is another.
Leave the item damp. Instructions Wash the item you plan to dye with no fabric softener or other laundry enhancements. You should add dye according to the directions on the package but for fiber-reactive dyes you will usually measure in 2 to 4 teaspoons of powder per three gallons of water.
If you love what youre reading let us know by subscribing to our newsletter. Locate where you want the center of your tie dye bullseye and pinch the item there. You probably already know how tie-dyeing works.
Once the microwave is done remove the shirt and open the plastic letting it cool down. The longer it sets the more vibrant the colors will be. Bullseye Tie Dye Pattern To make a large bullseye design.
Remove the rubber bands and rinse a little more. You can use the rubber bands in the kit or use zip ties to gather the fabric and tie it tight. Lay the item out flat.
Determine where you want your bullseye to start pull that piece up and place a rubber band around it. How to tie dye - Prepping your item Soak your item in warm water and then put it on a machine spin to remove the excess water so its. You will need to stir the powder into the hot water.
Create circles of tie-dye color on shirts and other fabrics with the bullseye tie-dye technique. Finally wash it and voila one brightly-colored pattern is born. Find an appropriate workspace to use the dye.
Get a white piece of fabric scrunch swirl or fold it in a certain way then add a few strategic rubber bands. Learn the basics of this classic tie dye look. Pinch a small section of fabric at the center of the shirt.
Wring out excess water. This will create a heat chamber that helps bond the dye with the fabric. Use a heart to add impact to a T shirt tote apron or pillow slip anytime of the.
Advertisement Rinse the shirt under cold water until the water runs clear. JOANN provides simple instructions with steps on how to make a brilliant bullseye tie dye shirt. Just pinch your fabric into a tube and add rubber bands to your hearts content.
If youre using a T-shirt remember to separate the front and back layers. Continue down placing rubber bands as you go. Learn the bullseye tie dye technique online at JOANN.
Place in the washing machine. Cover dyed fabric with plastic wrap and set aside for a few hours or overnight to set. Before beginning this project read the instructions for the Tulip One-Step Fashion Dye or Tulip Permanent Fabric Dye.

Tie Dye Design Tutorial Video For A Bullseye Tie Dye Shirt Youtube

Tie Dye Bullseye How To Make The Classic Tie Dye Pattern Chaotically Yours
How To Tie Dye Bullseye Pattern

Diy Bullseye Shirt Diy Tie Dye Shirts Tie Dye Shirts Patterns Tie Dye Diy

How To Tie Dye Bullseye Pattern

How To Tie Dye A Shirt Bullseye Technique Youtube
Bullseye Tie Dye Technique From Tulip Favecrafts Com

Tie Dye Your Summer Bullseye Tie Dye Technique Tie Dye Patterns Diy Tie Dye Diy Tie Dye Shirts Patterns

Tie Dye Bullseye How To Make The Classic Tie Dye Pattern Chaotically Yours


